Choosing and installing piano casters
Posted by Sarah Czarnecki on
Piano casters are the wheels attached to the legs of your piano. They help make moving your instrument easier and give the piano a polished look.
Unless, of course, the original casters are broken, missing, or outdated.
Old casters can scratch up the floor, dent rugs, get rusty, stop working, or just look tired. Once they've reached this stage, they'll need to be replaced with new modern hardware with rubber, cast iron, or brass wheels.

Which kind of casters should I get?
First, choose the best type of wheels for you and your needs. Remember to ensure the weight rating of your new casters is right for your piano. Not to worry, all of the casters in our shop are rated for the weight of a piano.
Types of caster wheels

Rubber wheels are best for hardwood floors. If you're replacing your old casters because they're chewing up the wood, you'll want rubber replacements. These wheels are best for pianos that will be moved around the room for cleaning, performance, or other reasons.
Brass or cast iron casters are aesthetically pleasing. If your piano's casters are due for an upgrade and you're not concerned about moving your piano anytime soon, try cast iron or brass. They're rough on flooring, but that's what caster cups are for.
Swivel casters, much like swivel chairs, have 360-degree motion. The wheels can turn in any direction, which makes moving pianos much easier. These purpose-made wheels tend to be rubber.
Rigid casters only move forward and backward. They're fixed in place and are very sturdy. Brass or cast iron casters tend to be rigid. We don't offer this type and we don't recommend them.
Most common caster styles
The style you choose is dependent on your piano. Take a look at your piano's "feet." Are they hidden underneath the instrument, or are they on display?
Grand pianos have all have of their legs visible. Uprights and spinets are a little more discreet. It may look like your upright piano has two legs in the front and a square body in the back, presumably sitting right on the floor. Actually, there are casters in the back, you just can't see them.
It's always recommended that you replace your casters with the same size and design. Different sizes or styles might change the height of your piano, which could potentially make it unlevel. The holes bored into your piano by the manufacturer will decide which type of caster you need.
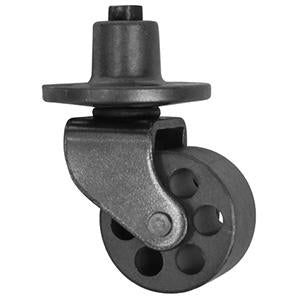
Stem-mounted casters, on the other hand, are attractive and discreet. Thankfully, they're the most common style! Spinets and many uprights use this style of caster screwed into the bottom of the legs. There's a hidden socket to receive the end of the caster, and it's usually 1-1/2" deep and 5/8" or 7/8" diameter -- larger for larger grand pianos. These kinds of casters allow the wheels to swivel and may have single wheels, dual rubber wheels, or metal wheels.
Leg dollies are used exclusively on grand pianos and come in sets of three. These sturdy casters are meant for instruments that get moved around the room a lot. They're a great choice if your grand never had casters in the first place.

Upright dollies are a good choice for pianos that are moved around often or are pushed over uneven surfaces and carpet. The larger casters are usually visible in front of and behind the piano. This is a popular style for schools, churches, and other musical venues.
Plate-mounted casters are screwed into the bottom of your piano leg. This style is most commonly used on uprights, where the wheels aren't on display. These are purpose-focused casters, not aesthetic upgrades, and we don't recommend them.
You may have noticed brass "socks" above your piano's casters. These are called ferrules and are for aesthetic purposes only. They might help support the stability of the wood around the caster stem inside the leg, so you probably shouldn't remove them if you have them. Not all pianos have them, either. Don't worry about replacing this part of the piano leg when installing casters -- even if this part is patinaed or scuffed, they rarely need anything more than a good cleaning.
Measuring for your caster size

One often-overlooked variable when replacing casters is sizing. Get down on the floor and look at your piano's current casters. These are the measurements you'll need to know when purchasing your casters:
- Wheel diameter
- Wheel width
- Mounting plate diameter OR shape and socket design
Unsurprisingly, wide wheels are meant for larger instruments and daintier ones are for smaller pianos. If you don't see your size in our shop, contact us! We have a huge inventory and are always updating.
How to install piano casters
Replacing casters is not as technically advanced as some other maintenance tasks. There's less finesse required, but it's still challenging because you'll either turn your entire piano on its back or take off its legs. Tilting or lifting and disassembling your piano is a big job, and attaching the new casters must be done correctly -- and most importantly, safely -- if it's going to be done at all.
Difficulty: Easy to Intermediate
You will need...
- A set of piano casters (remember to measure!)
- Caster hardware (may be included in your caster kit)
- Screwdriver
- Hammer or rubber mallet
- At least two strong assistants to help you
- Recommended for uprights and spinets: piano tilter (if one's not available, you'll need sturdy blocks of wood)
- Recommended for grand pianos: piano jack in the box or stand
- Recommended: caster cups
Uprights and Spinets
This first step is the toughest. We've said it before and we'll say it again: pianos are heavy. Ask for help when moving your piano and take every possible safety precaution to protect your back and knees. It's very easy to get hurt doing this without professional moving tools, so if you're not 100% sure you're up for the task, hire a pro.
Remember, you need to tip the piano onto its back. Not its side, not its front, not upside down -- on its back. Not only might you risk hurting yourself or your home by doing this incorrectly, you might damage your piano's action. Remember, pianos are finely calibrated instruments that really don't like to be moved, so you'll need to do this as gingerly as possible.
The best way to do this is with a piano tilter. It looks like gym equipment, but it's really the safest and easiest way to move your piano onto its back. Stand behind your piano and wedge the lifting part under the back of the piano. Using the handles, slowly tilt the device backward. You may need to steer your tilted piano to a location where you can work on the casters. When you're in a good position, tilt the device all the way back. Now the piano will be horizontal.
Amazingly, this tool makes it possible for one person to tilt the piano and holds it up and a good height for working on the casters. Even though it's possible to do it alone, we highly recommend the buddy system.
If you don't have a tilter and you're planning on laying the piano directly on the floor, be sure to carefully set the corners on the back on wood blocks. A box of 2x4s is fine. What are the wood blocks for? Because it's very difficult to get your hands underneath the piano laying flat on the floor, but the wood blocks prop them up enough to get a grip. You'll definitely need the buddy system for this trick. (PS - our tech used this technique only once before rushing out to buy his own piano tilter.)
When you're finished replacing the casters, reverse this process and your piano will be safely replaced where it was.
Grand Pianos
Your grand piano can stay where it is, but you will need to take off the legs so you can work on the caster without worrying about the instrument falling on you.
Do this by setting the jack in the box underneath the piano, next to the leg you'll take off first. Follow the instructions on your hydraulic jack in the box device and safely raise the piano up off the ground. If you are using a piano stand, ensure that it's the correct height before inserting it under your piano. Again, this process should never be done alone, so always have someone assisting you when lifting your piano.
Now, take a look at the way the leg is attached to the body. Every piano model is different, so we can't tell you exactly how to take off the leg for your specific instrument. Some legs are screwed in, some are wedged in place by wooden bars, others have a key lock, and still others are attached by bolts. Take your time, research your piano's make and model, and be careful to avoid damage. Consider calling a professional technician if you're still unsure.
This should go without saying, but only take off one leg at a time. Securely replace the leg where it belongs after you've finished installing the caster.
Installing the caster

Remove the caster and all the old hardware. Remember to brush out debris before attaching the new one, especially if you're using a stem-mounted caster.
Take this opportunity to double-check that you've selected the right size for your new casters. Measure the mounting plate and ensure that your new wheels are the same size as the old ones.
When replacing with plate casters, you'll see that the new one will fit right inside a rectangular recess made just for the caster. If this isn't the case or you've decided to replace stem-mounted casters with plate casters, make sure the plate will be large enough to go over the old hole.
With stem casters, make sure the stem is very tight in the piano leg. There should be absolutely no play or wiggle room, otherwise the wheel will break off and go flying from the weight of your piano. Hammer in the included bushings to make the stem fit perfectly, if necessary for a tight fit.
When you're ready to attach the mounting plate, make sure everything is aligned just right. You can use shims (cardstock washer-like discs) to lift up the plate if it's too low, or sand the bottom of the leg to raise it up.
Now screw the plate into the piano. If the old screw holes are still in good shape, you can use these, or you may wish to drill new holes.
If you're using a stem-mounted caster, pop the wheel in place. The wheel should rotate freely and leave a little bit of clearance so the piano doesn't drag. You can add a drop of lubricating oil like 3-in-1 if necessary.
Now, once you have your casters replaced, you'll want to protect your floors from the weight. Place caster cups on the floor under the wheels to distribute the weight. These are easy to use, come in a rainbow of colors, and keep your piano from sliding. Learn more about using caster cups here or shop from our huge selection right here!